Installing RabbitMQ with homebrew

Hi Readers,

As many of you must know about RabbitMQ which is a widely used message broker service. I was trying to set it up on my mac with Homebrew but I got a 403 error from one of the hosted servers.

brew install rabbitmq

Screen Shot 2018-09-30 at 1.28.13 PM

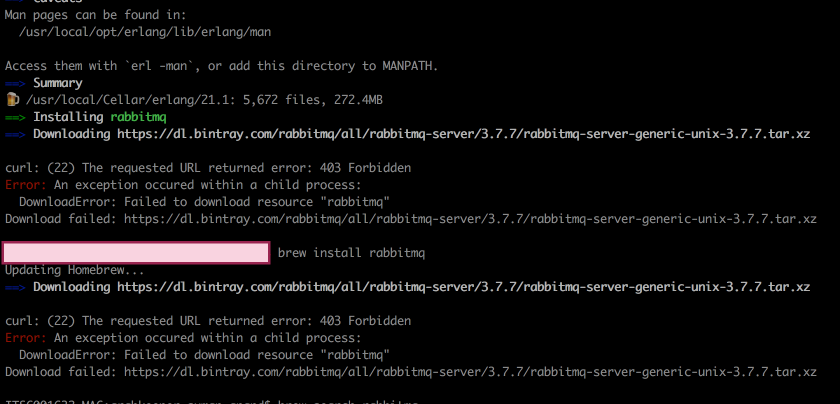
Then i went through the RabbitMQ’s download page and found a list of installation binaries. Now problem was how do i tell homebrew to install from the working links rather than a link that is returning 403.

The solution that I came up with is quite generic and can be used for any package not just RabbitMQ. Suppose for some reason the download url doesn’t work then you can modify the url and tell homebrew to install from the working url.

Here’s what I found. So homebrew has a concept of formulaes where it maintains a sha256 hash of the package, installation url and the dependency list of that package. So every package in homebrew is registered with a formula.

And the cool part is you can create formulaes and contribute to homebrew. So coming back to the solution. Here are the steps that you need to follow :-

  1.  brew edit ${package_name}
    Here package name will be the package formulate that you would like to edit. So for this case it will be
    brew edit rabbitmq
  2. This will open the formula in your preferred editor. Now comes the editing. If you’re a ruby developer you would be able to understand the code for the formula. You should be able to see the url which was throwing 403. So i copied the binary download link from download page and replaced the url param.
  3. Once that is done save the file and run brew install rabbitmq.
  4. Screen Shot 2018-09-30 at 1.59.54 PM.png
  5. Looks like we aren’t done yet. The sha256 hash of the new link that we just pasted doesn’t match the hash which was generated with older link. So just copy the new hash and replace it in the editor against the sha256 param and try running  brew install rabbitmq again.
  6. Homebrew should be able to fetch from the new link and rabbitmq will be installed.

Remember not to run brew update. As it will fetch the formulaes from remote and your changes will go away. But if push comes to shove you can change it back again after the brew update.

Here’s the reference code for the formula if you find any trouble with the installation.

class Rabbitmq < Formula
  desc "Messaging broker"
  homepage "https://www.rabbitmq.com"
  url "https://github.com/rabbitmq/rabbitmq-server/releases/download/v3.7.8/rabbitmq-server-generic-unix-3.7.8.tar.xz"
  sha256 "de4b07aa2c95c39660fedaf32941ba4f58bd75121cb7611f40cb504d756dce4d"
  revision 1

  bottle :unneeded

  depends_on "erlang"

  def install
    # Install the base files
    prefix.install Dir["*"]

    # Setup the lib files
    (var/"lib/rabbitmq").mkpath
    (var/"log/rabbitmq").mkpath

    # Correct SYS_PREFIX for things like rabbitmq-plugins
    erlang = Formula["erlang"]
    inreplace sbin/"rabbitmq-defaults" do |s|
      s.gsub! "SYS_PREFIX=${RABBITMQ_HOME}", "SYS_PREFIX=#{HOMEBREW_PREFIX}"
      s.gsub! /^ERL_DIR=$/, "ERL_DIR=#{erlang.opt_bin}/"
      s.gsub! "CLEAN_BOOT_FILE=start_clean", "CLEAN_BOOT_FILE=#{erlang.opt_lib/"erlang/bin/start_clean"}"
      s.gsub! "SASL_BOOT_FILE=start_sasl", "SASL_BOOT_FILE=#{erlang.opt_lib/"erlang/bin/start_clean"}"
    end

    # Set RABBITMQ_HOME in rabbitmq-env
    inreplace sbin/"rabbitmq-env",
              'RABBITMQ_HOME="$(rmq_realpath "${RABBITMQ_SCRIPTS_DIR}/..")"',
              "RABBITMQ_HOME=#{prefix}"

    # Create the rabbitmq-env.conf file
    rabbitmq_env_conf = etc/"rabbitmq/rabbitmq-env.conf"
    rabbitmq_env_conf.write rabbitmq_env unless rabbitmq_env_conf.exist?

    # Enable plugins - management web UI; STOMP, MQTT, AMQP 1.0 protocols
    enabled_plugins_path = etc/"rabbitmq/enabled_plugins"
    enabled_plugins_path.write "[rabbitmq_management,rabbitmq_stomp,rabbitmq_amqp1_0,rabbitmq_mqtt]." unless enabled_plugins_path.exist?

    # Extract rabbitmqadmin and install to sbin
    # use it to generate, then install the bash completion file
    system "/usr/bin/unzip", "-qq", "-j",
           "#{prefix}/plugins/rabbitmq_management-#{version}.ez",
           "rabbitmq_management-#{version}/priv/www/cli/rabbitmqadmin"

    sbin.install "rabbitmqadmin"
    (sbin/"rabbitmqadmin").chmod 0755
    (bash_completion/"rabbitmqadmin.bash").write Utils.popen_read("#{sbin}/rabbitmqadmin --bash-completion")
  end

  def caveats; <<~EOS
    Management Plugin enabled by default at http://localhost:15672
  EOS
  end

  def rabbitmq_env; < "rabbitmq-server"

  def plist; <<~EOS


        Label
        #{plist_name}
        Program
        #{opt_sbin}/rabbitmq-server
        RunAtLoad
        
        EnvironmentVariables
        
          <!-- need erl in the path -->
          PATH
          #{HOMEBREW_PREFIX}/sbin:/usr/sbin:/usr/bin:/bin:#{HOMEBREW_PREFIX}/bin
          <!-- specify the path to the rabbitmq-env.conf file -->
          CONF_ENV_FILE
          #{etc}/rabbitmq/rabbitmq-env.conf


  EOS
  end

  test do
    ENV["RABBITMQ_MNESIA_BASE"] = testpath/"var/lib/rabbitmq/mnesia"
    system sbin/"rabbitmq-server", "-detached"
    system sbin/"rabbitmqctl", "status"
    system sbin/"rabbitmqctl", "stop"
  end
end

Thanks. Cheers 🍺🍺

Infinite Scrolling with recompose and graphql

Hey guys,

It’s been a long time since I posted something.

This post is about implementing infinite scrolling in React with the help of graphql and recompose.

Infinite scroll is UX wise a better way when compared to other approaches like pagination when you don’t know the size of your response data and also when it’s expensive to fetch the number of records in the response.

A prerequisite before going through this post is you should know React.

That was infinite scrolling and now talking about graphql which is an implementation over REST framework where the user can specify what information it needs and graphql on the server side would only send that much information. It’s really useful when your response payload from the server is huge and it also helps when you don’t want to make multiple calls to fetch data from different sources. All the browser needs to do is just make a single call specifying the set of data it needs and server side GraphQL will handle the aggregation of calls and data accordingly.

Speaking about the other tool recompose. Which provides an option to enhance your stateless functional components by providing states, handlers and lifecycle methods without the hassle of creating a stateful component. Recompose is a great tool for creating HOCs which helps in decoupling the logic from rendering. So your component would just concentrate on rendering and the Higher Order Component will handle the state, or event handling or even lifecycle methods as componentDidMount.

1xcf7x

Now coming the main topic which was infinite scrolling. First part is to add event listeners. I am going to add 2 event listeners which are on ‘scroll’ and ‘resize’ events. Now we need to figure out which is our scrolling container in order to add listeners. This depends on the structure of your HTML and CSS. On adding an event listener to scroll you have to be really careful about removing and attaching of event handlers when you’re job is done or underway. So one thing is after attaching the event listener on render it should be removed before unmounting. Also whenever we plan on the making the server query to fetch more data we should remove the event listener and add it again after the component update. So far so good.

import { lifecycle } from 'recompose';
import ListComponent from './ListComponent';

const attachListener = event => {
   scrollEl.addEventListener('scroll', handleLoadOnScoll);
   window.addEventListener('resize', handleLoadOnScoll);
}

const detachListener = event => {
   scrollEl.removeEventListener('scroll', handleLoadOnScoll);
   window.removeEventListener('resize', handleLoadOnScoll);
}

function componentDidUpdate() {
  attachListener();
}

function componentWillUnmount() {
  detachListener();
}

export default lifecycle({
  componentDidUpdate, componentWillUnmount
})(ListComponent);

So here I have a Stateless functional component called ListComponent which is wrapped under the HOC which adds the lifecycle methods on the ListComponent. Now like i said earlier I have add the event listeners for scroll and resize. And i am removing the listener before unmount. But here i am using componentDidUpdate instead of componentDidMount because i want the first set of data to be there before we can initialise the scroller.

Now graphql has a special method known as fetchMore which is made for this very purpose of loading more data. Below I am going to wire the fetchMore functionality. The handleLoadOnScoll will call the fetchMore method.

import { lifecycle, compose, withHandlers } from 'recompose';
import { graphql } from 'react-apollo';
import ListComponent from './ListComponent';
import QUERY_GQL from 'query.gql';

const attachListener = event => {
   scrollEl.addEventListener('scroll', handleLoadOnScoll);
   window.addEventListener('resize', handleLoadOnScoll);
}

const detachListener = event => {
   scrollEl.removeEventListener('scroll', handleLoadOnScoll);
   window.removeEventListener('resize', handleLoadOnScoll);
}

function componentDidUpdate() {
  attachListener();
}

function componentWillUnmount() {
  detachListener();
}

const updateCache = (previousResult, { fetchMoreResult }) => {
  ...previousResult,
  comments: [
     ...previousResult.comments,
     ...fetchMoreResult.comments,
  ]
}

const ListComponentWrapper = compose(
  withHandlers({
    handleLoadOnScoll: (data: {fetchMore, comments, loading}) => event => {
      event.preventDefault();
      const offset = scrollEl.scrollHeight - scrollEl.scrollTop - scrollEl.clientHeight;
      if (offset <= threshold && your_condition_for_cursor && !loading) {
        detachEventListener();
        fetchMore({
          variables: {
             cursor: cursorForNextLoad,
          },
          updateQuery: updateCache,
        });
      }
    }
  }),
  lifecycle({
    componentDidUpdate, componentWillUnmount
  }),
)(ListComponent);

export default graphql(QUERY_GQL, gqlConfig)(ListComponentWrapper);

Wooh. Lots of stuff to digest right. Let's go one by one. First I created a wrapper for graphQl query at the end which takes the query and graphqlconfig object and wraps the result around ListComponentWrapper which will be our enhanced component. Also a thing to note is graphql provides a boolean `loading` inside the data object of response which can be used to figure out whether the query is under processing or has executed completely. So after the query has executed the data object which has fetchMore method, the response data which here i am calling it as comments and the loading boolean is passed down to the enhanced component ListComponentWrapper.
Now lets understand the working of withHandlers HOC. withHandlers is used when you want to attach event handlers to your component. So as I had mentioned earlier that handleLoadOnScroll will be called when scroll event is executed. So now we need to calculate the scroll position at which we need to load the data. For that I have used the properties scrollHeight which is the current height of the container, scrollTop is the top position of scroll bar and clientHeight which the height of the viewframe for the element. Based on that we receive a value which can be compared with the threshold to fire the fetchMore query. I have also added another check as a custom logic to tell when to stop calling the api depending on when you reach the end of data and there is a check for data.loading should be false. So that the fetchMore call is not made multiple times.
So if all conditions are met then we remove the eventListener to avoid unnecessary queuing in the callback queue. You can read about the parameters that can be passed to fetch more here Fetch More documentation. Now there is a parameter called updateQuery which will append the new result to the initial result in the apollo cache. If you are wondering what … are for then you can read about it here. Spread syntax

Now when the call is successful the lifecycle method componentDidUpdate will be called and event listener will be attached again.

Now lets write our ListComponent.

import React from 'react';
import Loader from './Loader';

export default function ListComponent(data: {comments, loading}) {
   if(loading &amp;&amp; !comments.length) return Loader(JSX tag);
   return (
        {
         // rendering a list of comments
         <div>comments.map(comment =&gt; ( {comment.message} ))</div>
         {loading &amp;&amp; comments.length &amp;&amp; Loader(JSX tag)}
        }
   );
}

So here I am checking if loading is true and its the initial load which i am checking if comments are there or not then render the loader which can be any fancy loader that you wish to use otherwise it render the comments. But the catch here is that i have put another loader below the list which will render when loading is true and its not the initial load.
There was a problem that i had faced if I wasn’t checking for the initial load then whole page would render again and the scroll position would be reset to 0 and it will go to top which is definitely a bad experience as you have to scroll down to the bottom to see the newly loaded content.

So this is it. Although I have made this post a bit lengthy. I hope you guys found it useful. If you any suggestions or comments please post it down.

Cheers!


Stigma of forEach on nodelist

Hey Guys,

Today i would like to share my thoughts on executing forEach function of Javascript on the nodeList. Now many of you might be aware of forEach loop which is another version of “For Loop” particularly for an array with a callback attached to it.

var array = [ini,mini,myni, moh];

array.forEach(function(ele, index) {
  console.log(ele);
});

Above is a simple code that just iterates over the array and console logs’ the element.

Now the problem is that its exclusively for an array. When you try to execute it on the nodeList which we get either by using querySelectorAll or something like getElementsByTagName. Well nodeList is a list of nodes that we get by querying the DOM.

document.querySelectorAll('div')
//It will list all the divs inside the document in the form of a nodelist.

Now the problem is if i do nodelist.forEach in Chrome, it works fine but in firefox it throws me an error saying forEach is not defined. Let’s come to the solution. What we can do is to map the forEach from nodelist to an array by

[].forEach.call(document.querySelectorAll('div'), function(ele, index) {
   console.log(ele.innerHTML);
});

This is one solution. But it has fallbacks. What we can do is define the forEach function for nodelist in our code which will iterate over the elements just like the forEach function.

NodeList.prototype.forEach = function(array, callback)  {
  for (var i=0; i< array.length; i++)  {
    callback.call(array[i], i);
  }
}
document.querySelectorAll('div').forEachfunction(ele, index){});

So this is the whole deal.

Hope you liked it. Happy coding.

Image Compression using Javascript

I have made a plugin that enables you upload image files to the server with a front-end side compression using javascript. So basically the image that you upload gets redrawn on the canvas with new dimension that you specify in the options and a compressed base64 encoded string is obtained from it. Now most of us these days have a phone with a fancy camera, that clicks the images of sizes of around 8-13 MB. So uploading that kind of size onto the server is totally not acceptable. So you wish to either compress on front end side or the server side. Android has some libraries that allows you to compress the files before sending onto the server, but on the other hand there is no such solid lead available on the browser side.

So here’s a plugin that comes to the rescue.

You can find the related files on my github repo

I have listed out the events, methods and options for incorporating the plugin.

Methods

uploadFile(options)

This is the initializer function for upload file plugin. Just call this function on the div on which you want to trigger the upload file plugin, with the options object.

$(‘#divID’).uploadFile(options)

startUpload()

This function starts the upload by making a post call to the server. For this function to work you have to disable autoSubmit property of uploadFile.

$(‘#divID’).startUpload()

stopUpload()

This function stops the upload by setting a flag to disable the form submission.

$(‘#divID’).stopUpload()

remove()

This function as by the name removes the upload area from the DOM.

$(‘#divID’).remove()

Options

url

Specify the url in the option on which to submit your form data.

sizeLimit

Specify the size limit that you want to set for the image file before compression. Default value is 16 MB

maxWidth

Set the maxwidth for image as it gets resized. Default value is 500

maxHeight

Sets the maxheight for image as it gets resized. Default value is 500

quality

Sets the quality that you want the image to be in. Default value is 0.5

outputType

Specify the output file type that you want to submit to server. Default value is png.

isBase64

Its a flag which when true sends the image as a base64 string to server and when false sends a blob object. Default value is false.

allowFileType

In this you have to pass an array of accepted file types for the image. Default value is [‘jpg’, ‘png’, ‘jpeg’]

enablePreview

Flag which when true shows the preview of the image that is going to be sent to server. Default value is false

previewSelector

This option is dependent on the enablePreview option. You have to specify the container element in which you want the preview to be seen. Its also helpful when you have set the autoSubmit property to false.

inputFieldName

The key for the image object which you want to send in the formData. Default value ‘avatar’

autoSubmit

Flag for auto submission of the form on upload. Default value is true

isDragNDrop

Flag for enabling the drag N drop feature on your upload area. Default value is true

appendFileInput

In case you want to handle styling of input type = “file” tag on your own. You can set this option to false. As this option will append the input type = “file” in your upload area div. So when you set it to false, you have to also write the input tag inside the upload area div. Default value is true

fileInputSelector

This is dependent on appendFileInput property. If you have set appendFileInput to false then you have to specify the ID of the input file tag in this option.

allowMultiple

Flag which when true allows to upload multiple images at a time. However be careful to increase the payload limit of your server, as it might get big. Default value is false

maxFiles

Now if you allow multiple input on the plugin, then you can specify the maximum no. of files you want to allow at a time.

Events

onLoad

Event is fired on plugin load

beforeSubmit

Event is fired just before submit of file

onSuccess

Event is fired on successfull upload

onError

Event is fired on error.

I haven’t done anything on the styling part, coz i guess most of you would want to do it on your side, since everybody wants a custom thing. So you can go through the IDs of the element that i have created and style it on your own. This repo only contains a simple JS file.

So feel free to write any suggestions.

Responsive Design challenges for iPhone

I was working on responsive design for mobile website, and there were some issues that I faced, especially in iPhone (safari browser). I have listed them below

  1. When i was using input text tags in my html code, I saw that on trying to enter text inside it or you could say on adding focus onto that input tag the web page automatically zoomed in to a particular level, just to make the content readable. It was OK to me until that but the issue it didnt go back to the previous zoom level. This behaviour was in Safari browser in iPhone. Upon looking into it I came to know that whenever the font-size of the input field is below 16px then the safari browser automatically zooms in the input field to make it more readable. So, in my case setting the font-size to 16px broke the rest of the UI for me as I would have to change other font-sizes as well just to match that particular input field. So i chose to use a hack for iphones by setting the meta tag property of user-scalable = “no”, to prevent zooming. This is the JS code that i used
    var isiDevice = function() {
      return /ipad|iphone|ipod/i.test(navigator.userAgent.toLowerCase());
    }
    
    if (isiDevice()) {
      var viewport = document.querySelector("meta[name=viewport]");
      viewport.setAttribute('content', 'width=device-width, initial-scale=1, user-scalable=no');
    }
    

    Of course there are many other ways to accomplish this, one would be to actually follow the convention of setting the font-size of text inputs to 16px.

  2. Next thing that i observed was that if the div is scrollable by using the property overflow: scroll in CSS, then the scroll bar was not visible in safari browser. So inorder to display the scroll bar I would suggest to use the code below in your CSS for that div.
    webkit-overflow-scrolling: touch
    

    This again is just a hack. You can read more about this property in this article about momentum scrolling.

  3. I was using sessionStorage of browser to store some key value pairs inside it. But the strange thing is that the sessionStorage doesn’t work in private mode of Safari browser. It throws an error when you try to set any keyvalue pair in it. So just a heads up in case you suddenly wonder whats really going on in the background. It maybe because of the private mode in safari.
  4. I was implementing hamburger menu for the website. So when the menu was in open state it was observed that if you wanna scroll down in iphone browser you get a unexpected jerk where the page behind the overlay also scrolls upon scroll the hambuger menu. I used a fixed overlay to hide the contents of main page when the menu is open and also used fixed position for the menu in open state that lies above the overlay using z-index.
    .overlay {
      position: fixed;
      top: 0; bottom: 0; right: 0; left: 0;
      background: rgba(0,0,0,0.5);
      z-index: 1;
    }
    
    .hamburger-menu {
      position: fixed;
      overflow: scroll;
      height: 100%;
      width: 75%;
      max-width: 285px;
      z-index: 10;
    }
    
    body{
      position: fixed;
    }
    

    I used position fixed on overlay and made it to cover the entire page to make sure the page isn’t scrollable after this. This worked as a charm in android browser but in iphone browser the page was still scrollable to some extent. So as a hack for it. I added position: fixed on the “body” tag. That solved the issue.

  5.  Another problem that you will face is the automatic scroll up of page when the input field is present at the bottom of the page. Also you need to handle the scroll event in a efficient way because of the keypad that pops up whenever you focus on any input text field. So i would suggest you keep the height of your section containing input field around 50px more than usual just as to prevent the hiding of input field when you are trying to type anything. It gives a bad user experience if you cant see what you are typing.

So these were the key points to keep in mind while making your site responsive. Also try keeping the divs height width as relative as possible. Use % for metrics, for making it scalable on all devices. As the responsive design is all about aligning the content vertically so you would often come across a problem where you would want your content to be vertically center aligned. Then try to use display : table, table-row, and table-cell to achieve this, or use display: flex. Read more about flexbox here.

Here is a demo of using display: table for vertically arranging divs. Sometimes you need that your div cover up the remaining height of parent div. Here is how you do it.


Thanks for going through the post. Hope you liked it.

Responsive Design using rem, em and px

Hi Again,

Today i will be discussing the use of em, rem and px in responsive design mode. In the classical web design we used to use px for fonts and other metrics, and still many of us are using this kind of practice. But is there something wrong with this approach? Suppose you have a scenario where you need to play with the font sizes. Suppose you need to increase the font size of a particular section, so in that case one approach is going through each child element and setting the font sizes to a desired value. Still thinking what’s wrong!

In the time where you would want every part of your application to be modularised. You also need to take this into consideration. Follow a particular structure when you are using metrics in your CSS. Nowadays we are more focused towards making our site responsive. In that case a structured CSS may come in handy, as it is observed that the fonts are desired to be a bit larger as compared to desktop version to improve visual quality and refinement.

This is where you want your fonts, padding and margin to be relative rather than absolute. This is to avoid the scenario of modifying these metrics for every element and this also makes the CSS lengthy. So CSS offers rem and em to add the relative nature to your metrics.

Now lets understand what rem and em is. Every browser predefines a certain font-size to every element that inherits html and body. So whenever you specify the font-size of a element, it basically overwrites that browser’s property. Browsers also follow rems and ems to specify the default font-size. Now Rem is relative to the html tag’s font-size, while the em is relative to the current element if the font-size is specified inside that element or relative to the nearest parent that has font-size specified. I know this sounds confusing, so i m sharing a Demo to explain things better.

View on Codepen

By default the html’s font-size is set to 16px. So when I use 1 rem unit it means I m assigning 16px font to that element. Here i have overwritten it to prevent browser dependency. You can inspect the output in console in the computed section to see what i was talking about.

Screen Shot 2016-03-13 at 7.21.34 pm

Now we need to follow a particular convention to make good use of rem and em. Use rem for Global styling while use rem for local styling. Like specifying the container divs style in rem, and for elements like h1,h2,p etc. use em styling. That makes the fonts more scalable and easy to edit.

Thanks.

If you found this post useful do comment or like. 🙂

Lazy Loading for images Implementation

I m sure many of you aspiring web devs must have come across performance improvement techniques to improve loading time of web page. It is necessary to have non-blocking resources in your web page so that the content is not blocked. By default HTML and CSS are blocking resources. Apart from that JS can be made non-blocking by loading it asynchronously or loading it in the end, when all resources are loaded and rendered. If your website is really interactive, it will be full of images. And these images eat up most of ur loading time. So lazy loading is needed for this purpose, such that only those images have network call that are present in viewport, while others are not. You will notice a fair amount of improvement after implementing this.

I have come up with a lazy load implementation with jquery and some Javascript.

function lazyLoadOnScroll() {

// image array
this.images = [];
this.lazyCount = 0; // keeps the count of elements legible for lazy load

// fetches the elements with lazy class and filters the one that are not to be displayed on mobile
var query = document.querySelectorAll(‘.lazy’);
for( var i=0; i< query.length; i++) {
if (query[i].getAttribute(‘data-background’)) {
images.push(query[i]);
lazyCount++;
}
}

// checks if the image exists inside the viewport and is visible
this.isElementInViewport = function(el) {
var rect = el.getBoundingClientRect();
return (
rect.top >= 0 &&
rect.left >= 0 &&
rect.top <= (window.innerHeight || document.documentElement.clientHeight) &&
$(el).is(‘:visible’)
)
}

// sets background images of div or src of image tag
this.loadImage = function(el, callback) {
var imgSrc = el.getAttribute(‘data-background’);
if (imgSrc) {
if ($(el).hasClass(‘lazy_parent’)) {
var imageTag = el.querySelector(‘img’);
if (imageTag.getAttribute(‘src’) !== imgSrc) {
imageTag.setAttribute(‘src’, imgSrc);
}
}
else {
el.style.backgroundImage = ‘url(‘ + imgSrc + ‘)’;
}
}
$(el).removeAttr(‘data-background’);
callback ? callback() : null
}

// initializes the lazy load
this.lazyInit = function() {
for (var i = images.length-1; i>=0 ; i–) {
if (isElementInViewport(images[i])) {
loadImage(images[i], function() {
images.splice(i,1);
lazyCount–;
});
}
}
}

if (lazyCount > 0) {
lazyInit();
}

// touchmove for mobile devices and executes lazy load on scroll for other devices
scrollEvent = $(window).on(‘scroll touchmove’, function(event) {
lazyInit();
if (lazyCount == 0) {
$(this).unbind(event);
}
});
}

Now lets go part by part of this function lazyLoadOnScroll().

Here is the working demo for this code..

To load the image using lazy load, add ‘lazy‘ class on the element. If you are using image tag then on the parent div add ‘lazy’ class and along with that add ‘lazy_parent‘ class. Its that simple. Now the key here is we dont specify the background-image property or add image src attribute for images. Coz on adding this property the images network call will be done. The key is to store the image url in data-background tag and load the images after the JS is loaded and load the images using JS. This will help you in avoiding unnecessary network call at the time of page rendering.

First of all I have defined an image array (images) that will contain all the elements containing lazy class. Next variable is lazyCount which stores the count of all elements having data-background set to some url. In the next section I m just fetching the elements having lazy class and pushing those elements in image array while increasing the count for same.

Next up is a function that checks whether the image is present in viewport or not. This function is the key to decide whether to load the image or not to. It uses the bounding rectangle property of Javascript element, to get the height, width, top, bottom, left and right. Along with that it also confirms if the element is visible or not. Coz there are some scenarios in which you would need to show some images dynamically and would not show images in the beginning. Then you would have to trigger the lazyLoadOnScroll function on the show event of image.

Next function loads the image or you could say makes the network call for that image, by adding that image’s src or setting the background-image property if its not an image element. Like I said earlier just add the ‘lazy_parent‘ class on the parent div of image tag. It reads that and changes the src of child image tag. In the end it deletes the data-background property and pops that element from ‘images‘ array, which is provided in the callback function.

Now we just have to iterate through all array elements and check if it exists in the viewport and load images accordingly. On page load the function should be triggered. So call the lazyLoadOnScoll function() on page load event. LazyInit is called to initialize the lazy load. Now to idea was to load images only if they are present in viewport. So on window scroll event i have attached the function to load images. And on completion of loading of images the event is removed.

Now for CSS i would like you add transition property on your element with lazy class just to give it a bit of fade effect.

.lazy {
-webkit-transition: background-image 0.3s ease-in-out;
-moz-transition: background-image 0.3s ease-in-out;
-o-transition: background-image 0.3s ease-in-out;
transition: background-image 0.3s ease-in-out;
background-position: center top;
background-repeat: no-repeat;
}

Thanks for reading this post. If you find it useful do comment.


Iteration with deletion in Array JS

We often face a basic problem of iteration through an array in Javascript, but recently when i was implementing lazy load in my app, I came across a problem in which i had to delete the element parallely as i was iterating through the array, to avoid running two separate loops for both. So there are 3 approaches that i tried which i will explain below, and only one of them is a correct way to do it.

1.  Running a basic for loop from i=0 to i= array.length

var dummyArr = [1,2,3,4,5,6]

for (var i=0; i< dummyArr.length; i++) {

if ( dummyArr[i] == 2 || dummyArr[i] == 3) {

dummyArr.splice(i,1);

}

}

Now this will give output as dummyArr = [1,3,4,5,6]. It skips the ‘3’ coz after splice is called the indexes in array are modified, just for starters splice is used for deleting element in array (Array Splice). So that element was skipped

2.  Next approach that i tried was using forEach method ( forEach ) in JS. It also does the same thing as basic for loop, but in my conquest towards becoming a better JS dev. I try to use some new and cool things for my code to look better.

var dummyArr = [1,2,3,4,5,6]

dummyArr.forEach(function( elem, index) {

if (elem == 2 || elem == 3) {

dummyArr.splice(index,1);

}

});

So like I said it does the same thing as a basic for loop, nothing fancy. It ignores the elements that are newly appended and skips the indexes that have been deleted.

Output — dummyArr = [1,3,4,5,6]

3.   Last and apt approach was running a reverse for loop through the array.

var dummyArr = [1,2,3,4,5,6]

for (var i=dummyArr.length -1; i>=0;  i–) {

if ( dummyArr[i] == 2 || dummyArr[i] == 3) {

dummyArr.splice(i,1);

}

}

Output — dummyArr = [1,4,5,6]

Now in this case on deletion of element and modification of index the upcoming element’s position and value are not compromised which was happening in previous cases. So the element can be deleted as u desire it to be.


Thanks for going through the post.. Will come back with a new post soon.

Adios

Reading a UTF-16 encoded file in java and writing back into it.

I have had recent troubles in reading from file which i didnt know was UTF-16 encoded. So i was getting some weird kind of output when i tried printing it. So on googling and with someone’s help, i was able to resolve the problem and want to share this with you guys out there.

First comes reading

Now for reading a file in java as we all know it can be done in a quicker way using the bufferedinputstream.

So what we can do is

File file = new File("File Path");
BufferedReader br = new BufferedReader(new InputStreamReader(new FileInputStream(file),"UTF16"));
try {
StringBuilder sb = new StringBuilder();
String line = br.readLine();
while (line != null) {
sb.append(line);
sb.append(System.lineSeparator());
line = br.readLine();
}
String everything = sb.toString();
System.out.println(everything);
} finally {
	br.close();
}

Note we used “UTF-16” as a parameter in the FileInputStream to read in that encoding. “UTF-16” is common in log files as well as some files with unknown extension.

A second way to do this is by simply reading the contents of file as you already used to do. And then when you are done after obtaining a string, you can do something like this.

BufferedReader br = new BufferedReader(new InputStreamReader(new FileInputStream(file)));
try {
        StringBuilder sb = new StringBuilder();
	String line = br.readLine();
	while (line != null) {
		sb.append(line);
		sb.append(System.lineSeparator());
		line = br.readLine();
	}
	String fileContent = sb.toString();
        final String defaultEncoding = Charset.defaultCharset().name();
        final byte[] utfString = fileContent.getBytes(Charset.forName(defaultEncoding));
	fileContent = new String(utfString, Charset.forName("UTF-16"));
} finally {
     br.close();
}

Now you have the content in readable form. You can always try printing if you are not sure.
Now do some appending or modification with the text. and after this you wanna write it back to the file which expects “UTF-16” encoded string. So, we will reconvert the string to be written to “UTF-16” encoding.

Suppose you would be needing to write the string str into file then.

FileOutputStream fs = new FileOutputStream(file);
fs.write(str.toString().getBytes("UTF-16"));
fs.close();

And here we go, you are done.
In case of any queries or suggestions feel free to comment below. I’ll be happy to help you out.
Happy coding guys.